camera-angle

8 awesome camera angles for perfect food photography

Discovering wonderful camera angles n astonish you with their vivid effect. But, for a quick  review, let’s discuss a few most largly used angles in food photography.
Diagonal – A different way of looking at food. Shooting the product from the diagonal angle can give wonderful shots, especially when you have to shoot multiple pieces. This angle would smartly hold the product’s multiple planes in one frame.

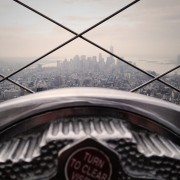
Close up – Close up angles give us assurance that the food is actually irresistible. Taking the camera quite close to the dish can indeed highlight the crisp texture, imperfections, and colors so well that the dish would appear far more appetizing. It will indeed add a more natural element to the appearance.

From Above – All that glitters upside is gold from inside. The camera is held above the dish and moved towards it till the dish is not entirely captured in the frame. If the composition has contrasting colors, the image will come out to be dashing and dynamic.

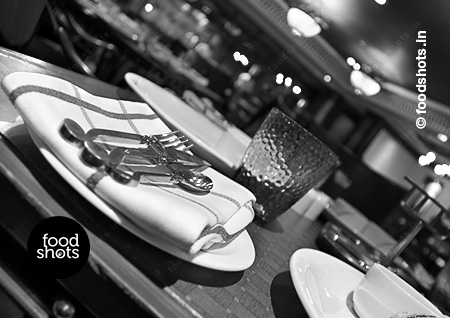
The tilt towards the right – What if the dish greets the viewer. For that, you simply need to tilt the camera towards the right. Using this angle will also help in highlighting the visually better or more important side.

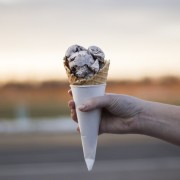
In the air – Let the food view amaze the viewers. If you can manage to create a shadow-free and single-colored background, you can also have the privilege of shooting from crazy angles. It will certainly make the dish more attractive as if it is flying.

In the middle – Let’s go modern. The camera largely focuses on the object as the center. Such kind of shot would give rise to a contemporary look. It is very much trending.

Parallel with a line – Imagination combined with intelligence delivers amazing work. Use your senses. Observe any line formed on the object, keep the camera parallel to it. It shall sum up to a very celebratory picture, stressing vividly on the certain portion of the food product.

Slight tilt – A Human mind is thought to begin observation from the right direction. Apply some logic. A slight tilt of the camera towards the right would logically prompt the viewer to read the photograph the way you want them to.
The above-mentioned angles will you help depending on which portion of food you want to stress. After reading this, excellent food photography is surely in making.
camgirl

10 quick revisions before editorial food photo shoot

The food photo shoot is tomorrow. Just to check, revise the following –

1. Pick a simple yet pleasing setting
The essence of setting is to enhance the visual of the food. But if the former is too grand or glittering, we doubt you will achieve the main purpose. Plates with basic and contrasting colors are the key.

2. Maximum usage of natural light for natural looking subject
Although, it might not be feasible in all cases. But, do try to retain the charm of natural light wherever possible. For that, you may shift the set next to a large window. And a white curtain would be an added advantage as it ‘ll disperse the light.

Note: Avoid, using flash if there is a lack of natural light. It will only contribute to those unnecessary sparkling spots.

3. Harmonize the colors with a fine balance
One of the biggest drawbacks of not having natural light is those yellow or blue casts that make food look synthetic. If nothing then the white balance would come to this rescue. Adjust it for a flawless pic.

4. Be stable
When there’s a scarcity of light, dim atmosphere, and long exposures say in eateries would make the image blur even with the slightest movement. Making the use of a tripod is the best solution. If you are still to buy it, rest the camera on a water glass or the back of a chair.

5. Take as many pictures as possible
The more options the more choices and a greater probability to pick the best image. So, click all the angles you think could work wonders. And, choose the best.

6. Magnify
Come closer to the subject, as much closer as possible. Make use of the macro setting if your camera features it. Let the entire frame be brimmed with food so that the while viewing, the feel of tasting it is evoked.

7. Arrangement
May you get more astounding pictures taken during the process of food preparation. So, capture every stage.

8: Rush!
Food spreads its freshness via images. Its condition says it all. Be active. Get things done faster. Otherwise Cold meat and de-moisturized vegetables can’t please anybody be it visually or tastewise.

9. Microscopic features
A few details can wipe out all your efforts. Inspect the edges of the dishes and clean all the visible stains. Of course, little but notable efforts like usage of sauces and garnishing would also help in shadowing those undesirable details.

10. Shoot only when you feel it’s right
Just as you follow the instincts of experimenting with this angle or that angle; also follow the obvious instinct that certain dishes and angles can’t give appetizing pictures.
Lighting tips for food photography

10 Lighting techniques for flawless food photography

1. Widen the light source –If the window that is sourcing the light is broad enough, it will do a wonderful job of the reducing the contrast level, sheltering the unnecessary texture details, and dwindling the shadows. Place the subject near the window where it doesn’t receive the sunlight instantly but diffusely. Food photography tips help you in evolving from amateur photographer to a professional one.
2. Bring the light source closer – Don’t get bewildered! There can be a certain position which provides indirect light yet located quite intimate to the light source. It’s effective to move the lamps closer to the subjects to highlight them better during the indoor shooting.

3. Dispersion makes the light spread and soft –
You should observe that in the winters, fog essentially becomes a medium to scatter the light into multiple directions. The brightness is soft and subtle. Since every day can’t be foggy, you are advised to use a translucent or white cloth to moderate the lighting effect.

4. Use the bouncing light –
If the region that sources light is narrow, then the ray shall bounce and get diffused further. In fact, the shiny reflector, a mirror (for example) will effortlessly bounce the focused light. Although the ray will be restricted in terms of area. To make an adequate reflector, wrap the crumpled aluminium foil around a cardboard.

5. Light gets dimmer with the increasing distance between subject and light source –
More is the gap between the light source and subject, the dimmer is the light. The law says the hero becomes square times lighter when moved away from the light source. During outdoor shooting, the camera’s flash can make the light on subject’s face comparatively less flashy without disturbing the background exposure.

6. Use light drop off to define subject and background –
The subject and the background have different visual importance. The former holds more attention so it deserves to appear brighter as well. Place the subject decently near the window that lights it from the front so that the background appears relatively darker.

7. The lighting direction decides the texture details –
If the light is positioned in front of the hero, the texture won’t reveal the unnecessary surface features. But, the case is opposite if the light is drawn from sideways or above. So, keep the light source in front when the texture isn’t that desirable. Such food photography tips alter the level of visuals from ordinary to extraordinary.

8. Shadows sets up volume –
The Three-D effect can be brought up by supplying the light from left, right, below or above – any suitable angle that casts significant shadows to make the image livelier and more reality-like.

9. Include a light source for the spark in the backdrop –
If you are lucky, the inclusion of the light source in the background might give a glittering backdrop. While the bright sunlight shall fall upon the subject – stressing less on the surface details.

10. The light itself has numerous color tones –
The sunlight in the day and evening would impart two different effects to the picture. As for a landscape, a clear bright noon will not yield the premeditated results. Therefore, set the camera’s color balance to cloudy. Or else, the landscape would appear needlessly blue during the bright daylight.
We hope these ten lighting techniques for flawless food photography prove to be of great help to you.
Herbs. Food Stylin and Food Photography Delhi India

How to preserve green’s green

For food photography garnishing is very important, it grabs the viewer’s attention and draws them towards the image. While in the cold times of the year, the preservation of the herbs is not a big deal. But, during the hot season it becomes a challenge.
The best way to get fresh herbs is to collect them from the growing plant, but what if it’s impossible? One of the wonderful ways to keep herbs fresh is to store them in the wet cheesecloth towel.
Here is the method
1. Wash the herbs carefully and remove all the spoiled parts
2. If roots are available, just wash them; avoid removing
3. Put clean cheesecloth towel in cold water, then squeeze it to remove the excessive water and wrap around the washed herbs
4. Put the wrapped herbs in the plastic bag or container and close it tightly
5. Keep the herbs in vegetable section of the fridge for about an hour before the photo shoot starts
Note:
1. While using the herbs for every shot,  wrap the remaining herbs again and put them back in the fridge as soon as it possible
2. Do not extravagantly wet the towel, extreme water may spoil the herbs
By the way, this method always works well if you love to add fresh herbs to your food. Enjoy!
How to keep the props clean. Food Photography in Delhi India by Foodshots.in

How to keep the props clean

Are you sure, as  a client, the props that you brought will work well for the photography?

Well, a prop might prove itself to be purposive enough. And, that compels an artist to reuse it during the same shoot. Your eyes are not magnifying glasses that they can observe all the towel or fingerprint marks. So, you need to dry the items. Otherwise, such distortions are so visible, that the picture has to be captured again.

All in all, the client needs to acknowledge what they are responsible for – from the clean look of the props to get rid of grabbing the ‘forbidden’ things from the set.

Rather than taking it as a burden, better read the following recommendations on how to keep the props clean.

Advice #1  Replace the regular towel with the one that has reusable microfibers. This amazing fabric doesn’t leave the particles on props and dry them much faster.
Advice #2 Use disposable gloves, especially if you work with metal props. In fact before the shoot, shiny metal  surfaces have to be cleaned with whitening powder for stainless steel.
Advice #3 As for the props rarely used for actual eating, you may like to use window cleaner such as “Mr. Muscle” to remove those undesirable fat spots.
Advice #4 If oily marks on the metal utensils are too old. Take refuge in using ammonia (try not to breath in while you clean, and close the bottle tightly). You can also boil small utensils such as forks, knives, small metal glasses and bowls in a big casserole in a mixture of ammonia, soda, vinegar and dishwasher (1 teaspoon of each on 3 liters of water).
Note :- This mixture can create a very strong reaction so add vinegar in the end and leave enough space in the casserole for some extra foam. Do not use this method for glass wares. If you like to keep your silver look like vintage one, then do not use this compound as it will make your silver look new and shiny again.
Advice #5 Before storing your props, wash them and wrap in paper, or place them in the textile bag. Doing this will actually save the life of your props, reduce contact with air and dust and save your time before shooting.
P. S. If you are going to use your props for real dinner after the session, make sure you wash them with hot water and everyday dishwasher. It will remove the remaining chemicals. Or better let props be props!
foodshots food styling

How to prepare the food for photo shoot? Part #1

 The photo shoot is tomorrow. And, a creative team awaits you in the studio. But, does the level of photography only depends on the skills of the photographers? If you are one such believer, then what about the client’s role?

 Because good looking food and the best-cooked food is not always the same. Let’s say cooked meat or vegetables are to be shot, then it is advised to not to cook them to the stage of tenderization. However, if the kitchen itself is in the studio or quite near to it, you may choose to cook the subject properly. In case, the food has been brought from far it may start looking dull. Rather than cooking it all over again, few minutes finishing and the final touches would do! Or else be prepared for ‘not so lively images’. While for many recipes fully cooked loses the desirable texture and color required in the pictures.

Note: Just like keeping the food less cooked for the favorable surface appearance and shades is crucial; that doesn’t imply you would keep it too raw. Because that would make the food, look unpalatable.

Because every ingredient has its own worth

Secondly, when the shoot is to capture the mixed food items; then do make it a point to bring all the components separately. To elaborate more, let’s assume that chicken biryani is the hero. Keep the biryani separate from the chicken piece. Otherwise, the rice would absorb its favored color and texture. That separate recognizable big piece of chicken placed over biryani would make the viewer enjoy its abundance and the dish would appear clean and clear.

 Know what to add and when

When recipes with gravy have to be highlighted, we call it the ‘wisdom’ to keep the ingredients in a fresh state. The key contents through appropriate addition can get a brilliant visual presence. Also, it would make sense to add gravy during the styling procedure only. Because gravy tends to get dried and create an unpleasant crust. That’s often the reason why food is rarely shot in a hot stage! It will ensure the newness of these components. As a result, the viewer gets drawn towards such an esthetically appealing dish.

1

Drooling Food Photography — 7 useful tips

1. Keep the food fresh, to create crisp photographs- While you ponder upon the ideas of capturing breathtaking images, the food to be captured is aging. Don’t let it fade away, try to captivate it in your camera imagination as soon as possible.

2. Try to bring the angle with a difference – Since, every recipe is privileged with different USP (Unique Selling Proportion), the angle from which it is to be shot varies too. Some of them would appear more appealing from the top view while other from the side or lower angle. Work on the aptest angle.

3. Instinct can do wonders – If you still feel unclear after trying numerous compositions, follow your instinct. Whatever idea has randomly hit your mind, if it still lingers around – FOLLOW IT AND IMPLEMENT IT.

4. Not camera but the photographer does the magic – If an expensive camera would be able to give you all the results then there would have been hardly any famous photographers in the world. A simple DSLR Camera will suffice with a nice lens, the rest depends on your ability and creativity.

5. Try to evade the flash – In many of the food photography cases, using the flash would only add unnecessary lighting which will camouflage the natural details. A food shot should rather seem real so as to look edible.

6. Props that highlight the core push – There’s definitely a pushing thought around which a photographer weaves the image. Try to include props which complement each other and the main recipe both from the aspect of the color as well as of size.

7. Accidents could better the picture – At times, while slicing the food product, there occur an “unexpected” spill or the so-called proper shape is distorted. Imperfection can be beautiful and add that natural element to the food photo.
Chefs in action Food Photography India

Chefs in action